2011 Audi A8L – Gold Detail

Click on any picture to view a larger image.
The car is daily driven 2011 Audi A8 in a dark green metallic that almost looks black. Working on something relatively new is always a treat for me; too often I’m doing vehicles with aftermarket paint jobs or aging restorations riddled with all manner of paint defects. The owner takes fairly good care of the vehicle, and told me that he makes regular trips to the local ‘hand wash’ volume shop, which made me cringe. Fortunately the hard paint found of most Audi’s is less sensitive to the improper washing that is all too common at these types of shops and showed little wear. It gets driven often so a good amount of dirt, dust, and road grime had accumulated.


The wheels had a heavy coat of dirt and brake dust on them, which was quickly taken care of with CarPro IronX and a variety of brushes. Extra care is taken to ensure that the entire wheel is clean. The front of the wheel, the back of the wheel, right down to the lug nut holes. The tires and wheel wells were scrubbed clean with a combination of Meguiars APC+ and Super Degreaser, both at a dilution of 4:1.


CarPro IronX is a very strong yet completely safe cleaner that reacts with fine iron particles from your brakes that become embedded on the wheel surface. As the cleaner reacts with the iron particles it changes color to a reddish purple.


The exhaust tips were rather filthy as well and probably hadn’t been touched since the car was originally assembled. The tips were first cleaned with Meguiars APC+ and then polished with P21S Polishing Soap. The luster and sheen was quickly restored!


The engine bay was in pretty good shape, but was a bit dusty and had a few oily spots. It was first gently rinsed with low pressure water, misted with Meguiars APC+ and Super Degreaser, and then detailed with a variety of brushes. The cleaners were rinsed off and then Optimum Opti-Bond at a dilution of 3:1 was misted liberally while the bay was still wet. The clean and dressed bay was left damp while I washed the car so the dressing could penetrate all the surfaces, and then wiped dry afterwards.


Once all the filthy details were taken care of, the car itself was washed. First it was foamed with Chemical Guys Citrus Wash N Gloss soap to loosen the dirt on the paint and to also strip any previously applied wax or sealant. Then it was washed with the same soap using the 2-bucket method and a super plush microfiber towel. The 2-bucket method is a staple of proper washing, as it works to separate the dirt that is remove from the car and the car wash being used to clean the car. You don’t want to be washing your car with the dirt that you’ve already removed from it, this is how swirl marks and a majority of scratches are caused.


Everything was then thoroughly rinsed, misted with Optimum Instant Detailer & Gloss Enhancer to help with a streak free dry finish, and carefully dried with a soft waffle weave microfiber towel.


The car was then pulled into the garage to prep it for polishing. Its essentially a new vehicle, and I didn’t anticipate needing to do much paint correction, but I took a range of paint thickness readings anyways. Checking the paint thickness and consistency tells me whether the paint is thick enough to work on, and whether special care needs to be taken around any thin spots. All of the paint thickness readings checked out fine, ranging from mid-80’s to ~140 microns, which is normal for modern factory paint jobs The paint color, texture, and metallic flake was homogenous as well so I had no reason to suspect any previous repairs or bodywork.


Next I turned the lights on to see what condition the paint was in. Inspecting the surface with a variety of intense lighting gives me a complete description of the scratches, swirl marks, and marring that is present and from there I can formulate a plan on how to correct these issues. Overall the Audi was in pretty good shape with few moderate scratches and mostly just superficial light scratches and swirls. The swirls create a slightly hazy appearance and diffuse reflections a bit.


Over time tiny bits of dirt, tar, and grime will become bonded to the surface of your vehicle, this occurs through normal usage. These contaminants are stuck so strongly that they won’t be removed by normal washing procedures, and your paint will still be rough to the touch after washing. If left alone, the dirt will limit the durability of applied waxes and the rough texture will provide a surface that is easier for dirt to cling to. There are a few ways that the paint can be deep cleaned to remove these issues, for this Audi I chose to use a Polyshave Decon block by CarPro. It uses polymerized rubber bonded to a foam block, and when applied to a well lubricated surface the rubber will grab at the bonded contaminants and mechanically pull them out of the paint, leaving behind a smooth clean surface.

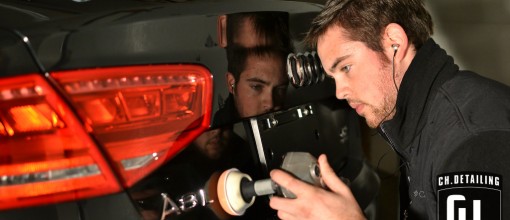
At this point the vehicle was completely clean and the surface condition was thoroughly inspected, it was time to polish. Given that the paint condition was rather good I knew that a 1-step polish would make the car look much better than when it was new. For this I chose to use the polish Sonax Perfet Finish, used with Lake Country Hydro-Tech Tangerine foam polishing pads of various sizes, on a Flex rotary buffer. When done properly, careful machine polishing can make a huge difference in the shine and appearance of a vehicle, but when the machine is in the hands of an unskilled novice it can completely ruin the finish. Who do you trust with your car?


The black plastic trim found on the B-pillars was particularly hammered, and the Sonax polish did little to improve it. I switched over to Scholl Concepts S3 Gold polishing compound with a 3” Lake Country Orange foam polishing pad, and plenty of care. Slowly working the abrasive compound until it had completely broken down revealed a dramatic change in the clarity of the finish.


After all of the polishing was complete (this step alone required 6 hours to do), the paint was wiped down with a solution of Isopropyl alcohol. The purpose of this wipe down is to remove any residual polishing oils from the surface so that the wax or sealant has a perfectly clean paint surface to bond to. This also helps me check against any unwanted filling of scratches or swirls that some polishes can inadvertently do, this is so that I know the surface is truly corrected and not just a temporary masking.


Lastly I applied a coat of Wolfgang Fuzion Carnauba-Polymer Estate Wax, a fantastic wax that yields concours quality appearance with excellent durability that lasts for months.

Once the wax was wiped off the shine and gloss was greatly increased, with a great ‘wet look’ to the surface.


Unfortunately due to time constraints and lighting, I wasn’t able to get photos of some of the steps completed. The interior was in very good shape and only needed a brief vacuuming and wipe down using Meguiars Quick Interior Detailer to take care of some dust and smudges. The wheels and exhaust tips were protected against future soiling with a coat of Rejex sealant, the glass was cleaned inside and out using a combination of Isopropyl alcohol and Optimum No Rinse. The tires were further cleaned with Meguiars #40 rubber cleaner and conditioner, and then dressed with Optimum Opti-Bond at a 3:1 dilution.
Thanks for taking the time to read, I hope you learned something and have a better appreciation for what goes into my Gold detailing package. I list all the products I use so that you may try them out if you desire. It isn’t what product is used that creates my results, but it is how it is used, and this is where my process and experience make the final result stand above the rest.
Please contact me to schedule your next appointment today!