1968 Ferrari 330 GTC
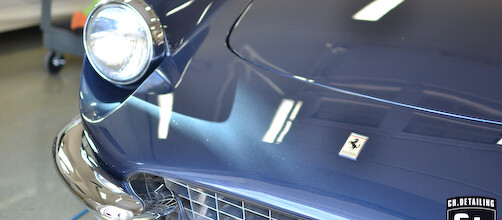

The Ferrari 330 GTC, a powerful and well balanced grand tourer for the enthusiast. Based on a 275 frame with front and rear unequal length double A-arms, a rear trans-axle, four wheel disc brakes, and a triumphant 4.0L V12 engine all contained within beautifully sculpted Pininfarina bodywork. The 330 came into existence during what many consider to be the ‘golden era’ for Ferrari, and as such the value for these vehicles has been steadily appreciating.
This car was restored from the ground up with a fresh coat of Azzuro Italver paint, re-plated trim, new rubber throughout, re-built mechanicals, and an entirely re-upholstered interior. The previous owner was a mechanic for Ferrari in Italy during his youth, and was the perfect candidate to do the work. The restoration was completed a few years ago, and was unfortunately already beginning to show its age.


The paint appeared dull, lackluster, and cloudy with poor reflections, which was a major concern for the new owner. The car had already been washed by the owner a couple of days previous, and had not been driven since and as such was fairly clean.


The car had accumulated some dust over the few days since it was washed, and there was some accumulated dirt behind the wheels, so I began with a rinseless wash using Blackfire.


The super plush Cobra Shamrock towel makes rinseless washing an absolute breeze!

The lower panels behind the wheels had some dirt splatter, so I opted to treat those with P21S Total Auto Wash first.

With how clean the vehicle was initially, you wouldn’t expect the wash water to be so dirty. This is the difference between simply ‘clean’ and properly ‘detailed’.

After the car was washed and dried, I removed the trim that would interfere with the paint correction later on, which included the trunk badges, the license plate and frame, and the side mirror.


I opted to remove the trim after the wash so as to minimize the amount of water that would run into the body. The dirty areas behind the trim were wiped down with a quick detailer solution of Blackfire rinseless wash. Next up I began to clay the car using Meguiars blue mild clay.

A claybar works to mechanically pull out embedded particles of dirt and contaminants. The paint was very clean and the clay pulled up few embedded contaminants.

Once the claying was complete I wiped down the surface with a solution of isopropyl alcohol to strip any residual waxes or oils. Removing these oils helps to reveal the true finish of the paint without hiding any scratches or swirl marks. This allows me to get a better idea of the issues I’ll need to correct.


The lower panels and the trunk lid were by far the worst areas on the car.


Once I had a good idea of what the paint looked like, and what sort of defects I would need to remove, I continued on with measuring the paint thickness. Measuring the paint is crucial when doing major paint correction work, as any thin spots in the paint need to be treated with extreme care so as not to polish through the finish. Given that this car has been restored, it was no surprise that the gauge showed readings all over the map. In these situations I’ll work off the lowest reading (which was 9.0 mils) and assume that all the thicker readings are due to body filler. In reality there may very well be thicker working thicknesses, but this is the safest way to go about it.


Once the car was clean, inspected, and measured it was time to mask the remaining trim to protect it during the correction.


Continuous, clean, and tight tape lines ensure that nothing will get snagged by the buffer and that none of the paint ‘edges’ gets covered up, ensuring a more thorough and safe correction.


After trying various combinations of polish, machines, pads, and technique, I settled on using Meguiars #105 Ultra Cut Compound with their Microfiber cutting pad with a spritz of Meguiars #34 final inspection spray with a Flex rotary machine polisher. With two passes this removed all the deeper scratches and swirl marks, but left a slight haze. To remove the haze I followed up with Meguiars #205 Ultra Finishing Polish on a Tangerine Lake Country polishing pad using a Porter Cable 7424 dual action polisher. This duo removed all but the most severe scratches.


After correction the paint lost its dull appearance and the metallic flake really started to pop.


Obviously not all areas can be polished by machine, so the side vents, A pillar, C pillar, and all other tight areas were polished out by hand using Meguiars #105.


The wheels appeared to be fairly clean upon first glance, but a closer inspection showed otherwise.


The tires were scrubbed down with Meguiars All Purpose Cleaner, Super Degreaser, and a short bristle brush.


The tires were really dirty!

The tires looked much better once cleaned and dried. CarPro PERL at a 1:1 ratio was later applied.


The chrome wheel centers, and the wheels themselves, were cleaned and polished using Menzerna Acrylic Jacket.


All of the chrome trim, bumpers, and door handles were showing similar signs of dirt and water spots, so all of that was polished up using Menzerna Acrylic Jacket as well.


The rubber weather stripping around the windows was dirty and beginning to show signs of oxidation, so it was carefully scrubbed with Meguiars #40 Rubber and Vinyl cleaner and conditioner.


Detailing an engine bay like this is always a sensitive affair, and thankfully it wasn’t terribly filthy to begin with.

All of the cracks and crevices were brushed out to remove any loose dust and dirt, rubber was scrubbed using Meguiars #40, the aluminum hood braces were polished with Optimum Metal Polish, and all hard surfaces were cleaned up using Menzerna Acrylic Jacket. If you haven’t noticed yet, this product really proved its merit. Even the oil filters were polished up!


The interior was still showing very nicely, and in order to make sure it continued to do so all the vinyl, plastic, and leather was first brushed and then cleaned with Blackfire Interior Cleaner. 303 Aerospace Protectant was later applied to the same surfaces. Interior and exterior glass cleaned with Eimann Fabrik glass cleaner, and exterior glass was treated with Blackfire Polymer Spray to increase water beading.


The steering wheel was looking dull as well, so it was polished by hand using Optimum Metal Polish.


Its important to mind all your edges and jambs, as these are the rarely seen transitional areas that can really make the difference between a simply ‘clean’ car and one that is truly ‘detailed’.


This car was given the ultimate in beauty and durability, as two coats of Blackfire Wet Diamond sealant were applied by machine (12 hours apart), one coat of Blackfire Midnight Sun carnuba wax applied by hand, and then finally topped up with Blackfire Polymer Spray.


The resulting shine and slickness out of this world!


The car was completed just in time for the season opener for our local Cars and Coffee, unfortunately the weather forecast of upper 70’s with sunny skies turned into lower 50’s and overcast skies.


Thanks for reading! Be sure to send me a message to schedule your next appointment.
Nice work! Is there a polish you’d recommend that lies in between the cutting compound and final polish you used?
Also, A Ferrari deserves better oil filters than Fram! =\
I would suggest trying out Blackfire SRC Compound, it has comparable cut to Menzerna Super Intensive Polish but has a much longer work time and wipes off with incredible ease. Pairing that with a white Lake Country foam pad should yield a decent cut and finish for a one-step correction!